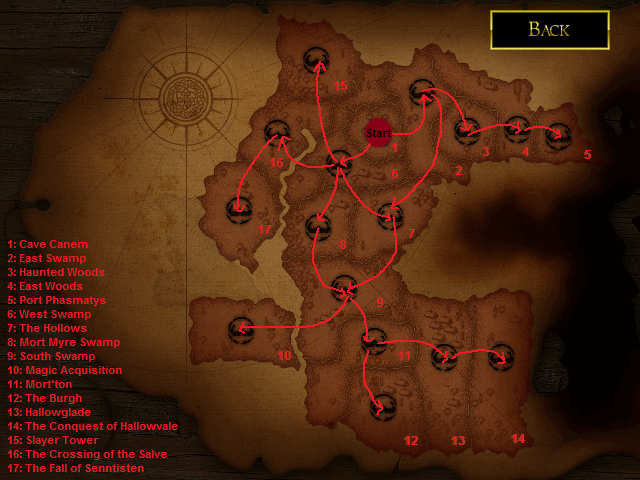
The Zamorak Returns campaign settles during the God Wars period, where Zamorak tries to claim Hallowvale and destroy Zarosian and Saradominist forces in the regions.
The campaign begins in Cave Canem, and completing an area unlocks all its neighboring areas for play, except for Mort Myre Swamp->The Fall of Sennisten and South Swamp->Hallowglade.
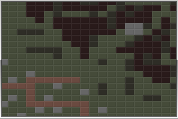
The Zamorak Returns's map interface, from where you can choose missions.
Tactics[]
Units[]
Skillful use of Skeletons and Werewolves is the key to the early missions. Skeletons can be used to surround your own units for protection, or enemy ones to blockade them.
A Necromancer next to the Skeleton heals it every turn, or raises a new one if it has been killed so you can summon Barbarians, let themselves be killed and turn them into Skeletons. In later mission they can be valuable, free shock troops for suicide attacks as when killed, the Necromancer who raised them raises/heal them; however, they are best as damage sponges. Opponents are attracted to your Necromancer, as it is a helper, and will try killing it first before they target your other units, use this as an advantage.
Zamorak Ranger: Assuming no terrain defences, it hits 90% of its total strength on any flyers or magi, 50% on any helpers, and 25% on warriors. See main page for full damage-class relationships. It is therefore excellent against Owls and will kill Monks if they have not been boosted by bones or kills yet. It is terrible vs. warriors, but 2 of them will kill a Paladin. Keep them far away from any warrior higher than 25/25.
Zamorak Mage: An excellent form of anti-warrior and anti-flyer weaponry. The advantage is that these two classes form the usual backbone of an attacking force, making them easy fodder for Mages. However, mages are slow, and thus are more suited to point defence, compared to Rangers, which are much faster and therefore more suited to a fast charge when the opponents have been weakened. Keep mages away from Rangers.
The Sea Slug is a skirmish unit that can take control of a unit with equal or less health. It is helpful for getting Monks or weakened Priests to heal units. This is good for getting barbarians that are trying to get your portal. However it is a very fragile unit, as it is slow and requires full health in order to benefit maximum from it.
Gargoyles are strong flyers, and can completely destroy a White Knight with 1 hit, or a lion or Greater Demon with 2 hits. However, they are vulnerable to archers and Icyenes. They are critical to success in the later levels. Their speed and range allows them to dispatch many foes and in a group, they are terrifying.
Greater demons are stronger than Lions, they can kill a White Knight in 1 hit. Their biggest weakness would be Icyenes.
Pyrelords are titans, they do massive damage (90% of its strength) and can kill almost any unit in 1 hit, but their biggest weakness would be their speed and inability to attack flying units.
Spells/Items[]
- Waders and Bridger: Useful for crossing water and marsh obstacles that feature heavily on many maps.
- Fire Shower >> Greater Fire Rain: Area spells that do 5 damage to 3x3 tiles or 7 damage to 5x5 tiles respectively. These are very useful for destroying groups of enemy Barbarians and Owls, slowing down his acquisition of buildings and interference with your own barbarians. Units that are not destroyed by these spell will often stop advancing and wait to be healed, or even retreat to a building to heal, which can be decisive in the Conquest of Hallowvale.
- Vampyric Blood: Gives the unit back any points it has hit on an enemy it attacks in melee only, as long as the possessing unit survives. So for example a Black Knight attacks a Lion - the Knight hits the lion for 12 bringing it down to 28, the Lion then hits the Knight for 14 leaving it at 11, but the Knight gets back the 12 it hit on the Lion for restoring it to 23. This ability works on both attack and defence. Essentially, it makes a melee unit very hard to kill, but not invincible. It costs the unit 1 health per turn. It is mostly only useful on warriors like Black Knights or Greater Demons, but in the right circumstances it can be useful on a Pyrelord or a Gargoyle.
- Shrine of Zamorak: Allows you to avoid summoning a unit to get to the next level, thus preserving mana for tougher units. The most common use is to raise a Ranger as early as possible to attack Owls, or summon a Werewolf, use this and summon a Zamorak Mage, so 200 or 250 mana isn't spent on a Zamorak Ranger or a Black Knight getting up to level 3. This has been found as the best way to summon a Gargoyle early on in a game. By summoning a werewolf, then using Shrine of Zamorak, you achieve level 3 favor. Then simply summon a cheap level 3 Sea Slug for a mere 100 mana, and get to level 4 favor. Once at level 4 favor, if you have the 600 mana, summon your Gargoyle.
Missions[]
Cave Canem[]

- Difficulty: 1
- Reward: Werewolf
| Starting Units | |
|---|---|
| Player | 8 Skeletons, 4 Necromancers |
| Canifis | 6 Wolves, 4 Werewolves |
| Opponent's Possible Spawns | |
|---|---|
| Canifis | None |

A possible arrangement: The necromancers are completely surrounded by skeletons, who they will heal each turn.
In-game description: The village of Canifis is a good starting point, and will provide us with troops we need.
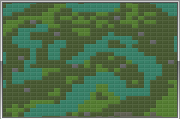
Map overview: There is a group of villages together, surrounded by swamps. There are forests throughout the map. Your starting position will be at the North East of the "village" of Canifis, whilst the Canifis team start at center of the map (in the village).
Strategy: This level is simple, you have Necromancers who can infinitely heal the Skeletons, and raise them back from bones (if they get killed). You can form a "Necromancer circle" where your four Necromancers are surrounded by your skeletons, and you let the opponents charge at you. The Canifis opponent won't have any source of healing, leaving you with the most advantage.
DO NOT use the necromancers for direct confrontation, let the skeletons to the fighting. Let the Canifis team approach your starting position, in the mean time mobilize your units to form a "Necromancer circle".
Note: You can also use spells like fire shower/rain, waders and the Bridger.
East Swamp[]
- Difficulty: 1
- Reward: Waders
| Starting Units | |
|---|---|
| Player | 1 Skeleton, 2 Necromancers, 3 Werewolves, 1 Barbarian Chieftain |
| Saradomin | 6 Paladins, 1 Barbarian Chieftain |
| Opponent's Possible Spawns | |
|---|---|
| Saradomin | Paladins, Barbarians, Monks |
In-game description: Saradomin troops are here. We must rid the swamps of them to make our way through the swamp.
Map overview: There is an open field with swamps between you and Saradomins' starting position. There are two portals at the East, both of which are separated by dense forests and swamps. You and Saradomin start at the opposite sides of the map (Saradomin starts from the North, whilst you start from the South).
Strategy: After taking the nearest portal, rush the barbarian chieftain to the other one, and keep the rest of their army stuck with your army where the swamps' passage gets narrow. This level is really easy to complete, as you can easily get the other portal without Saradomin getting there first, which makes it even harder to get a bronze score on this level.
Note: To win this mission, just kill the Saradomin Barbarian Chieftain. That will win the game even if the Paladins are still in the game.
Perfect score of 1354 (3 turns, 0 damage):
T1: Move your starting units to the west as far as possible. Take the portal with your Chieftain. Run away with your Skeleton into the bottom left corner of the map, and put a Necromancer next to it.
T2: Use Bridger on the swamp going to the island with the other portal, which will also remove some forests and put your chieftain as close as possible to the other portal (should be in the forest just next to the bridge). The rest of your army should continue to go west, and put the werewolves just outside the Paladins' range.
T3: Move your chieftain towards the other portal, he should be right next to it. The closest two paladins should be a 1 hit KO with two wolves if you use fire rain on them, and you should remain outside the other units' range. If your werewolves are far away from him, Saradomin's chieftain will sometimes move towards your original portal not the 2nd one. This puts him just inside your range if you summon a ranger from your portal (with shrine of Zamorak) and snipe him.
West Swamp[]
- Difficulty: 1
- Reward: +5% mana per turn
| Starting Units | |
|---|---|
| Player | 1 Barbarian Chieftain |
| Saradomin | 1 Barbarian Chieftain |
| Opponent's Possible Spawns | |
|---|---|
| Saradomin | Barbarians, Monks, Paladins, Saradomin Rangers |
In-game description: This land must be ours. Purge Saradomin's presence!
Map overview: You and Saradomin start at the opposite sides of the map, you have the East, Saradomin has the West. You both are separated by wide swamps. There is a tower at the center of the map which is also separated from you by the swamps. There is track right next to your portal that leads you towards the 3 villages at the South, and Saradomins' portal by going North and then West.
Strategy: Take the portal near you first, then send your Chieftain across the swamp to capture the tower. Send in Werewolves and defend him as he captures it. Send a Barbarian or two to capture the villages at the South, and also send a barbarian to capture the villages at the North East. Protecting the tower area with Werewolves, and advance towards Saradomin's portal at the same time. Assuming you have almost all the structures, a decent defense on the tower and a line of Werewolves on the road to Saradomin's portal, you should be very close to winning.
For a higher score you can use Black Knights, Rangers, Sea Slug, Shrine of Zamorak, and Bridger spell.
NOTE: If one has already completed the east swamp mission, (it is recommended that you finish east swamp first) One can use waders on the Chieftain to get the tower, and send normal Barbarians to get the villages.
Haunted Woods[]

- Difficulty: 2
- Reward: Zamorak Ranger
| Starting Units | |
|---|---|
| Player | 2 Werewolves, Barbarian Chieftain, Necromancer |
| Rangers | Owl, 2 Paladins, Barbarian Chieftain, 2 Saradomin Rangers, Valis (Elven Archer) |
| Opponent's Possible Spawns | |
|---|---|
| Rangers | Owls, Paladins, Monks, Saradomin Rangers, and Barbarians |
In-game description: An elf is helping Saradomin train rangers. Knock him out and get the secrets out of him.
Map overview: This map is a fairly open battlefield in the middle. On the East side, there are dense forests but with a tower and 3 villages, third one being isolated at the far South East corner. On the West side are forests with villages dispersed apart from each other. The sides are convenient for sneaking your Barbarians and capturing structure, but beware! The sides are also the starting areas of the Rangers' units! Your portal and starting units are situated together at the North, whilst the starting units of the Rangers are dispersed around the map (East and West), and their portal (and leader) being at the direct South (opposite from yours).
Strategy: In the first turn just move all your units towards Valis. But in the second turn you must make sure nobody can hit you. If you do that right, then it is already almost certain that you're going to win this in less than 10 turns. After the second turn you don't have to watch out for Saradomin's units anymore. At the other turns keep moving towards Valis and try to attack as less as you need other units of Saradomin. If you are close enough to Valis get 4 units around him and attack him every turn with those units.
Notes: It is impossible to attack the owl unless this is the second time you are playing this map, so just make sure it does not block your portal. Even if it does, it is of no major concern as long as no nearby enemy barbarians are around as the portal will deal it 3 damage per turn and kill it. It is a very impractical and wasteful move to trap ONE Owl with FOUR Werewolves, as you would have wasted 400 mana for pretty much nothing, and the Owl can easily fight its way out. However it may be practical to do so with skeletons raised by necromancers as they are not much use for anything else on this map, except for defence and when it is very close to the enemy portal. If you Sea Slug Valis his name will change to elven archer. To win after that you will have to take their portal and kill all their troops. Note: If you are as unlucky as I am, it may take up to four/five tries using this method, but, I found that, this guide for this mission does not say anything about spawning, but I will suggest simply spamming werewolves, and bringing out a few barbarians when you feel that your mana is not coming is fast enough, and as the guide says, just rush the boss, even if you hit, say 1, then die, the only exception being if our foe has a monk or two nearby, then take that out first.
This is a different strategy that solves many problems faced by many people. if there are any suggestions they are most welcome.Good luck on this method!!
A Different Strategy. This strategy has better chance of winning. Haunted woods is the only level which has not been described well. Well here goes.
Bring your whole starter armies to the forest nearby the tower, but BE CAREFUL of the ranger situated in the tower. Stay out of the range of the ranger, then summon a barbarian to go to the village near the river and near the tower and be bait. The ranger will move and kill the barbarian. Then, with your valiant werewolves, kill the ranger. After killing her, move your whole army to the edge of the map that is to say try to be as far as possible from Saradomin's view. Go on going and occasionally summon werewolves and follow them. In turn 1 make your chieftain barbarian go to the villages opposite the direction of tower, i.e.-west of your portal. Surprisingly, Saradomin does not send any soldiers behind your werewolves except two monks who come later after a few turns and attempt to block the path, and they can be a little troublesome so just kill them and proceed to your path. Make your werewolves go to the villages which are near to Valis. When I mean near the tower, I do not mean near the portal! The villages are situated west from Saradomin's portal and tower. Then, after you have brought many werewolves, go nearer and surround Valis with 4 werewolves. Now comes the hard part, Saradomin will summon two or more rangers to attack your werewolves, so send those 4 werewolves to kill the rangers and if possible to block the portal. Send your other werewolves to hit the rangers or kill Valis, if Valis survives, he may attempt to escape, so follow him and kill him to win the game.
Notes: In the first few turns Saradomin will send units to capture the villages east of the tower and portal, that is to say left with some Paladins and rangers. Ignore them and don't waste your mana to attack them. However, if they are going to attack your Chieftain then send some few units to occupy Saradomin's interest there which helps your werewolves to attack Valis without much interference.
Werewolf spam: Capture neighboring villages and build up a huge Werewolf army. Get one to sit on Saradomin's portal, and have the rest kill Valis.
Summon a barbarian to take the village to the east of the portal. DO NOT GET ON THE VILLAGE!!! This isn't to get that village, but to get rid of that annoying Ranger. She will come out and try to kill your Barbarian. Surround her with Werewolves and kill her. Then, take the village and tower while making sure that southern ranger doesn't get your Barbarian. Send your Chieftain with 4 Werewolves to the west villages, but not south near the portal. Amass a huge Werewolf army in front of your portal. Be defensive. If Saradomin sends people, kill them and turn anything that dies into Skeletons using about 3 Necromancers. Surround Owls with Skeletons that are helped by Necromancers. Charge Valis. Get a Skeleton with Necromancer on to the portal. Surround Valis with a werewolf on each side. This strategy isn't to get points but get past. Return with Rangers, Black Knights, and Slugs for a better score.
East Woods[]

- Difficulty: 2
- Reward: +5% mana per turn.
| Starting Units | |
|---|---|
| Player | 1 Barbarian Chieftain |
| Saradomin | 1 Barbarian Chieftain |
| Opponent's Possible Spawns | |
|---|---|
| Saradomin | Barbarian, Paladin, Saradomin Owl, Saradomin Ranger |
In-game description: Clear the woods of enemy presence. Strike through to the port - something strange is happening there, and we should investigate.
Map overview: The map is fairly open, with forests dispersed throughout. You start at the North East, Saradomin starts at the South West, opposite to yours like previous missions. There are two villages near your portal. There's a track East of your portal, that leads South towards the tower and village at the South East. There are two villages dispersed at the North West side. Saradomin also has an "objective village" right next to his portal.
Strategy: Summon some Werewolves and Barbarians and advance to the nearby tower. Keep summoning Werewolves to destroy their supplies of enemy units (mainly Paladins, Owls and Monk/Ranger). Watch out to not get trapped by Owls. Keep Saradomin units distracted around the tower area, whilst you sneak a Barbarian through the North West side towards Saradomins' portal. He will have low mana (less than 100), he won't be able to summon Paladins/Owls every turn.
Perfect score: This is doable in 3 turns with no damage once you have Greater Fire Rain, but you may need to try a few times. IGNORE YOUR PORTAL. Go straight south. When Saradomin summons an Owl and a Monk, you can fire rain them and they will leave you alone. Continue towards the house. You should be able to take it on turn 3.
Port Phasmatys[]
- Difficulty: 2
- Reward: Sea Slug
| Starting Units | |
|---|---|
| Player | 1 Barbarian Chieftain, 2 Skeletons, 1 Necromancer, 1 Werewolf |
| Saradomin | 6 Barbarian Chieftains, 2 Monks, 1 Saradomin Mage |
| Sea Slugs | 6 Sea Slugs, 1 Paladin |
| Opponents' Possible Spawns | |
|---|---|
| Saradomin | Barbarians, Monks, Paladins |
| Sea Slugs | Barbarians, Ogres, Menaphite Thugs, Locusts, Falcons, Bedabin Nomads, Black Bears |
In-game description: This peaceful hamlet will quickly fall to our power, but we must defeat the sea slugs which also encroach on the villagers.
Map overview: One-third (1/3) of the map is the sea, situated mainly South and South East. The land part (rest of the map) has a big network of tracks that go throughout, connecting the port and mainland (can used to your advantage, since you gain speed). The are a dispersion of forests and villages. There are 2 towers, one isolated at the North East corner, and the other in the center. Your units' starting position and first portal are at the North West corner. The Sea slugs starting units are dispersed throughout the Southern part of the mainland, from East to West, covering the port as well. Saradomins' starting units will dispersed as well, but also more North mainland, near your starting portal and the center. More than half of Saradomins' units will fall into the hands of the Sea Slugs, or get killed instantly.
Strategy: This level is easier than it looks. Even though the Sea slugs have 3 barbarian chieftains (which they take from Saradomin using Sea Slugs), they should be killed easily. Their mana at the beginning is 50, produced by the portal, and it should stay like this. The only unit you will need to combat the most with, will be that single ogre, or two Menaphite thugs that the Sea Slugs team will summon, and maybe later some Menaphite thugs (non of them should be a big threat since by then you'll have an army of Werewolves and Skeletons).
Start by killing the Saradomin Barbarian Chieftain, make sure your Necromancer is placed between the bones that are already there, and the new bones from the dead Saradomin Barbarian Chieftain. Get the North portal as quick as possible with the barbarian chieftain, and use the rest of your army in the middle. After your Chieftain captures the portal, go to the isolated tower at the North East corner, don't worry about the Saradomin mage. PREVENT the Sea Slugs from getting the villages and the center tower! To quickly prevent the center tower from being captured, send a werewolf or two, to kill the barbarian chieftain attempting to capture the tower. Send a Barbarian with 2 Werewolves towards the South West, where you have the 2 villages, watch out of the sea slug and prevent the other barbarian chieftain from capturing the villages. Keep spamming rangers and werewolves from the north portal. You will soon have a group of skeletons, summoned by the Necromancer. Swarm and block the Sea Slug portal quick as you can, by then all opponent units, except that isolated Saradomin mage at the East, should be dead, and victory should be yours. Whether you kill that mage or not, is up to you to decide.
Notes: The Saradomin mage at the East corner of the port never moves, it hovers at that spot throughout the entire game, even when the Sea Slugs are on the brink of losing. The mage is probably trying to heal itself by not moving, since the game starts with half its health missing. Do not worry about it approaching you. However, be careful not to walk into the Saradomin mage' range with your barbarian or other vulnerable units. If you block the portal and there are no other opponents present, that will be the only time the Sea slugs actually use the mage, but by then it won't be a threat since you can kill it with a ranger.
The key to this level to to rush, attack any opponent barbarian. At all cost DO NOT let the Sea Slugs capture the center tower and villages, and also the 2 villages at the South West. If the Sea Slug team manages to get additional mana sources, then they will annoy you with stronger units, making the game longer.
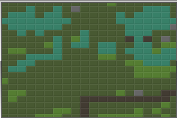
Golden strategy

This is how you should end in round 1, if you got both Shrine to Zamorak and Seaslugs.
If you have finished this level before and got your hands on Shrine of Zamorak, summon a Werewolf (or Skeleton) and use Shrine of Zamorak to summon a Sea Slug to take over the barbarian chieftain, and use the Chieftain to take the second portal in 2 turns! To do this you will need to keep your barbarian on the path as seen in the picture. Greater Fire Rain can also be useful.
The Hollows[]
- Difficulty: 2
- Reward: Black Knight
| Starting Units | |
|---|---|
| Player | 1 Barbarian Chieftain |
| Saradomin | 1 Barbarian Chieftain |
| Opponent's Possible Spawns | |
|---|---|
| Saradomin | Barbarians, Monks, Paladins, Saradomin Rangers, Saradomin Owls |
In-game description: Stronger Saradomin troops inhabit this area. Tread carefully and watch for enemy fliers.
Map overview: There are swamps and forests throughout the map, although the middle between North and South is fairly open. You should be able to travel at normal speed as long as you avoid the swamps at the middle. The North and South are covered in dense forests with isolated villages. You start at the East and Saradomin starts at the West. There is a tower (belonging to Saradomin), located East from the center portal, surrounded by forests and swamps.
Strategy : First equip your Barbarian Chieftain with Waders. You want him to get to the Tower in the middle of the map. Summon a Werewolf and two Barbarians. Get one to the east village and the other to the west village. Continue your expansion. When you reach Turn 4, your Chieftain should have gotten the Tower. DO NOT BOTHER ABOUT THE MIDDLE PORTAL. Continue to bring Werewolves to the middle portal. When Saradomin begins to summon some owls, counter it by summoning rangers. Don't forget to continue your expansion with your Barbarians. If you are quick enough, you should be able to get 6 of the villages in no time, and without resistance.
When you have enough forces fighting (the central island will be full of bones so it's probably good to get a necromancer for fast, free troops) near the middle portal, bring your Chieftain and capture the portal. If you are successful, you should have almost won the game. Continue to bring Rangers and Barbarians and close to Saradomins portal. He should go down in no time.
Notes: The key to the fight is to capture the Tower and the villages. Once you capture the tower, it will lower the mana income of Saradomin, thus he will mostly summon barbarians, paladins, owls and monks. He rarely summons rangers. Summon a good number of Zamorak Rangers and Werewolves will be the key to success.


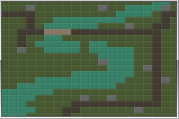
Use the Bridger spell in this way, so you can get to the second portal quickly.
Another strategy is to use the Bridger spell as seen as the image, then use Shrine of Zamorak to get your level to two and send an Zamorak ranger across the bridge and let your chieftain follow him. The goal in this is to rush to the portal as soon as possible as with the portal comes victory. On the second turn summon a barbarian to capture the house next to the portal and watch the Saradomins troops, if they start to become a possible obstacle to the middle portal then use Greater Fire Rain to delay them.
Mort Myre Swamp[]

- Difficulty: 3
- Reward: Fire Shower spell
| Starting Units | |
|---|---|
| Player | 2 Barbarian Chieftains |
| Saradomin | 1 Barbarian Chieftain, 2 Monks,2 Paladins, 2 Saradomin Rangers, 1 Lion, 1 Saradomin Mage |
| Opponent's Possible Spawns | |
|---|---|
| Saradomin | Barbarians, Monks, Paladins, Owls, Saradomin Rangers, Lions, Saradomin Magi |
In-game description: These swamps host a Saradomin fortress. Taking it over will likely provide us with a powerful spell.
Map overview: You start at the East side of the map. Saradomins' starting units are concentrated at the mid-West of the map, on the isle with his "objective tower" and his portal, surrounded by wide swamps. There are a dispersion of forests throughout the map, although the area on the isle is open with a small network of tracks, and the areas near your portal and on the mid-East, are also open. There is also a tower at the South East of the map. Saradomin starts with strong units but they shouldn't be a threat because they will be held up by swamps, and narrow East open passages of the isle.
Strategy: This is rather straight forward, the key to this mission is to distract Saradomin whilst you capture his "objective tower". Send one barbarian chieftain to the 2 villages North to capture, whilst you send the other Barbarian Chieftain South to capture the village belonging to Saradomin, and then move him to capture the tower isolated South East. Send the North Barbarian Chieftain towards the far West where there is another isolated village in the North West corner, near the objective tower, capture that village, and then from this point wait for the right moment to capture the objective tower.
In the mean time, DISTRACT Saradomin!!! Send Werewolves, Necromancers, Rangers and Knights to confront him at the swamps separating you both. His attention will be too focused on the confrontation, that his his units will forget to defend the tower. That will be the moment when you send you barbarian chieftain with waders, onto the objective tower. Victory shall be yours.
Notes: You can use bridge spell on that area, tempting Saradomin to use the bridge. Saradomin will be too focused on the battle that his units will eventually forget to defend the tower. Use that distraction to sneak your barbarian chieftain on the tower, using waders, and capture it. I did this, and completed the mission in less than 10 turns.
South Swamp[]

- Difficulty: 3
- Reward: Vampyric Blood potion
| Starting Units | |
|---|---|
| Player | 1 Barbarian Chieftain |
| Saradomin | 1 Barbarian Chieftain, 1 Lion |
| Opponent's Possible Spawns | |
|---|---|
| Saradomin | Barbarians, Paladins, Owls, Monks, Saradomin Rangers, Priests, Centaurs, Lions, Unicorns |
In-game description: This important geographical position will put us in reach of the ancient Mage Arena and the southernmost territories.
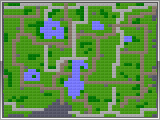
Map overview: There's a small body of sea at the North. There are forests and swamps dispersed throughout the map, but dense forests at the North East corner and South West side. There is a limited network of tracks that are long, they go North, passed your and Saradomins' portal, and the connect together at the area of the North portal. The center of the map is open, with a tower nearer to your portal. There is another tower South of Saradomins' portal. You start at the South East of the map, Saradomin starts at the West, but his Lion is at the far North (probably to guard the North portal), but it will slowly make its way to the tower area at the center.
Strategy: Start by getting the portal and spawning a few (2-3) barbarians to get the nearby villages while sending your chieftain to get the tower. OPTIONAL: send one of the Barbarians with waders equipped to get the one village. After you get the tower, have a ranger and werewolf cover the Owls and paladins, while sending a couple of Black Knights to deal with the Lion. If you have magi, then finishing off the Lion is not much of a problem. Capturing the second portal is practically the key to victory, as you can now spawn more troops to Saradomin's portal. He often sends paladins and occasionally Owls and Barbarians to your original front, but black knights and rangers can brush them aside. I have seen that not only will Saradomin use a few Paladins at your second front (especially when I brought out a Greater Demon), but he once sent a Unicorn to attack me there. Deal with these problems accordingly (a Black Knight will do). Try to complete it as soon as possible for a better score.
Notes: Slugs can be decent against Lions, let them get close and then use the Slug and capture the Lion.
For a quick win: First capture the portal. then send your barbarian on a beeline to Saradomin's portal, and send a werewolf to back him up. If Saradomin summons 2 Barbarians and an Owl, restart the game. If Saradomin summons 2 Barbarians and a Monk/Paladin, continue. Try to avoid the Paladin/Monk with your Barbarian and get to the portal without taking any damage. (This may take a few tries.) use your werewolf to deal with his chieftain, and spawn some more Werewolves from the newly captured portal to deal with any others. If they are closer to your original portal, send a Werewolf from there.
Note: The keys to this strategy are making sure that the barbarian captures the portal successfully (much easier if he doesn't sustain damage), and that Saradomin summons a Monk/Paladin. (AKA you can dodge it using the forest, whereas if he summoned an owl you wouldn't be able to.) Also, the Lion is to slow to inflict any damage on you, so he might as well not be there. Luck is a factor! Trial and error is a good tool here. You should get a gold score using this method. (Over 1000)
Note: If you have the Greater Fire Rain, the quick win strategy is actually easier if Saradomin summons an Owl. Simply use the fire rain on the Owl and Barbarian Chieftain at the beginning and you'll only have the Lion and a bunch of Barbarians to deal with. This can result in scores in excess of 1300.
Mort'ton[]

- Difficulty: 3
- Reward: Bridger spell
| Starting Units | |
|---|---|
| Player | 1 Barbarian Chieftain, 2 Hellhounds |
| Saradomin | 3 Barbarian Chieftains, 1 Lion |
| Opponent's Possible Spawns | |
|---|---|
| Saradomin | Barbarians, Saradomin Owls, Paladins, Saradomin Rangers, Unicorns, Priests, Centaurs, Lions |
In-game description: This forsaken village hides a bridge-building secret that will be quite useful.
Map overview: The map is more open. The swamps are situated on the boundaries of the map, and the forests are in very small numbers. There is a river / small lake at the center of the map, surrounded by villages and 2 towers near. There are 2 more towers further North of the center. There is a big network of tracks throughout the center of the map, which can be useful in helping you capture structures quickly and building an army. Your starting portal is at the North East, but you have two Hellhounds (one North West, and the other at the South). Saradomins' portal is at the West, he has one Barbarian Chieftain located North, and the other one located South between his portal and your South Hellhound. Saradomin also has a Lion at the far West.
Strategy: The key to this mission is the wreak chaos upon Saradomin. It shouldn't take very long before you achieve victory (less than 15 turns maybe). Keep preventing him from capturing any of the towers and villages at the center, annoy him and weaken / kill his vulnerable units with your Hellhounds. You can also send a Werewolf or two through the South East side of the center, so that it can kill any Barbarian / vulnerable unit, and protect your Barbarian. Saradomin may be able to capture a village (due to how busy you will become dealing with Monks and Paladins), but that should be it do not let him go further than that. Try and capture his tower at the North West of the center, but watch out for Lions and Paladins when you do so! Once you capture Saradomins' tower, his mana income will be very low, and by then you should have a Black Knight or two, one equipped with "Vampyric blood" to deal with the Lions. Keep summoning Knights, Werewolves, Rangers and at least one Necromancer too. At some point swarm and block his portal.
Use the Fire shower if you already have it unlocked. It would be better to use it on the Saradomin ranger at the beginning, so that it weakens it, allowing the Hellhound to kill it. Keep killing Saradomins' Barbarians.
Hallowglade[]

- Difficulty: 3
- Reward: Shrine of Zamorak spell
| Starting Units | |
|---|---|
| Player | 1 Barbarian Chieftain |
| Saradomin | 2 Saradomin Owls |
| Opponent's Possible Spawns | |
|---|---|
| Saradomin | Saradomin Owls, Barbarians, Monks, Paladins, Saradomin Rangers, Lions, Priests, Centaurs, Unicorns |
In-game description: As we encroach upon Hallowvale, the enemies stir and twitch. Let's crush them.
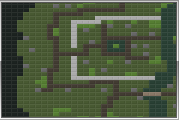
Map overview: This map is very open. There is a small distribution of forests throughout the map, and the West is covered by the Sea. You start North and Saradomin starts South. Saradomin has two towers are the far South that are not accessible as they are behind the walls. Saradomin also starts with two Owls positioned on the towers each.
Strategy: This one is very easy, as it is in a very open battlefield. Use your chieftain to capture the nearby villages, and extend to the south. If you get at least 300 mana per turn then you should win by swarming them with Black Knights. Saradomin uses diversified units, so be sure to supply your armies with Rangers, Knights and Magi. If you have Gargoyles, this will be even easier: Summoning only 3 of them should be enough to win. Continue your expansion and get his portal. It is incredibly easy to get a gold score on this level.
Notes: Be sure to look to the side of terrain, as Saradomin likes to get Barbarians to your villages the sneaky way. Necromancers will be very useful, as there will be a huge pile of bones, carefully and quickly get the Necromancer to the bones, watch out for Centaurs!
Crossing of the Salve[]

- Difficulty: 4
- Reward: Greater Fire Rain Spell
| Starting Units | |
|---|---|
| Player | 2 Barbarian Chieftains |
| Saradomin | 1 Barbarian Chieftain, 2 Monks, 1 Paladin, 2 White Knights, 1 Priest |
| Opponent's Possible Spawns | |
|---|---|
| Saradomin | Barbarians, Paladins, Monks, Saradomin Owls, Saradomin Rangers, White Knights, Saradomin Magi, Lions, Centaurs, Icyenes |
In-game description: We must cross the River Salve on our way to the Temple of Senntisten.
Map overview: You start at the South West corner, with your two Barbarian Chieftains and portal. Saradomin has a "base" around the center of the map, which has his starting portal, a temple and 2 villages inside. Saradomins' starting units are split into two groups: A) Monk, Barbarian Chieftain and Priest start in the base. B) Paladin, Monk and 2 White Knights, they start at the North East corner where there are 4 villages (one belonging to Saradomin), their position is likely so that they counter you at the embankment South East of the map.
The map has a range of mountains concentrated North mainly. There are small forests throughout the map, but the forests at the far South East are very dense, it will slow your movement severely. The areas South and East of Saradomins' base are very open. Your side of the river is also open. There's a big network of tracks throughout Saradomins' base, they go East to the 4 villages, and South to the villages near your bridge area. The track network doesn't cover the mid East or South East. There is a wide river separating you and Saradomin, it is at the Southern half of the map. The river length is all the way to the embankment at the South East, where there is access for non-amphibious units.
Strategy: Whatever you do,
1. Use your Barbarian Chieftains to capture all the villages before you do anything else.
2. You will certainly need lots of rangers and lots of knights. Vampyric blood can be useful on Black Knight, making him virtually indestructible (watch out for Saradomin mages and Lions, do NOT let the Lion attack the Knight first).
3. Casting Shrine of Zamorak can be a good idea. Using the Bridger spell can also be very useful to win this level, it will ease the game and Saradomin won't be able to summon a single Icyene, since his mana income will be smaller.
You can choose do it with, or without the Bridger spell.
Strategy 1: Without the bridge the game can be very long, beyond 25 turns. The bulk of your army (rangers, warriors, and helpers) will have to use the embankment / forests at the far South East of the map, in order to get to the other side of the river. But BEFORE approaching the embankment, prepare a big army consisting of a Necromancer (who will raise Skeletons), a few rangers and a black knight or two. Pair a black knight with Vampyric Blood. It is crucial that your army is big enough with a Necromancer, rangers and knights, because they will be isolated at the far South East, far away from your portal. It will take around 5 turns for a Ranger / Knight to go from the portal, all the way to the South East. You will come across Saradomin units (mainly white knights, paladins, a monk, a priest or a ranger), it is rare that Saradomin sends a Centaur.
Later in the game, he will mostly summon an Icyene every 2 turns, and sends them towards your side of the river, to your portal area. Snipe the Icyenes down with rangers. After the embankment confrontation, Saradomin won't have much defending units, you will have a colossal army (hoards of skeletons too) on his side of the river, compared to him. Swarm his base with all your units, kill all Saradomin units and cover the portal. Victory should be yours.
Strategy 2: With the bridge, the game is half the length, and easier. You should capture the villages on the other side of the river as quickly as possible, so that you gain more mana. Spam Rangers and a Black Knights, equip a knight with Vampyric Blood. Saradomin summons mostly Rangers, Paladins and Monks, although he may summon a mage. In rare cases, he summons a Lion / Centaur. He will funnel all his units towards your army at the South East of his base, be prepared for the incoming units.
Notes: Gargoyles and Hellhounds can be very useful.
Having the bridger spell from Mort'Ton can be extremely useful as outlined above, because if all the villages on the other side of the river are captured, Saradomin will hardly get a chance to summon an Icyene. As a result, not a single Icyene was ever summoned.
Magic Acquisition[]

- Difficulty: 4
- Reward: Zamorak Mage
| Starting Units | |
|---|---|
| Player | 1 Barbarian Chieftain |
| Saradomin | 2 Barbarian Chieftains, 5 Saradomin Owls, 2 Saradomin Rangers, 2 White Knights, 1 Saradomin Mage |
| Wizards | 2 Desert Magi |
| Opponents' Possible Spawns | |
|---|---|
| Saradomin | Barbarians, Saradomin Owls, Saradomin Rangers, White Knights, Saradomin Magi, Paladins, Lions, Priests, Centaurs, Unicorns, Monks |
| Wizards | Desert Magi, Barbarians, Druids |
In-game description: These mages will be mighty valuable once we show them who the strongest side is.
Map overview: You start at the mid-East, the Wizards start mid-North in their "base", and Saradomin starts at the South West corner. The Wizards start with two mages in their base, whilst Saradomin starts with an army of strong units, all near his portal. The map is very open, although there are small forests/jungles surrounding the Wizards' base, including the dense forest/jungle at the North East of the map. There are villages dispersed throughout the map, and 4 towers. There are tracks that link to the three of you.
Strategy: Although Saradomin starts with good units, he will mostly summon barbarians, owls, paladins, and monks. In rare occasions he either summons a Centaur or a Lion. Start by sending your Barbarian Chieftain to the tower North East outside the Wizards' base, send another barbarian South to the isolated village. Summon Rangers, Necromancers and a Black Knight (equip it with Vampyric Blood), send them all towards the area South of the Wizards base. By then your army size will outnumber Saradomins'.
At the beginning, Saradomin will channel all his units towards the Wizards, you let him do so. DO NOT send a unit too close to the South tower yet, otherwise Saradomin will send half of his starting army towards you, making the situation harder. Whilst Saradomin is distracted with beating the Wizards, use that opportunity to grab the tower and villages between you and Saradomins' portal area, and then swarm Saradomins' portal with your units. Then channel your units into the Wizards' base with Rangers and Skeletons, killing all the remain opponents units.
This may be a hard level to beat, especially without Fire Shower or Greater Fire Rain. Hellhounds can be useful too.
The Burgh[]
- Difficulty: 4
- Reward: Hellhound
| Starting Units | |
|---|---|
| Player | 1 Barbarian Chieftain |
| Seaside Mages | 3 Seaside Magi |
| Hellhounds | 5 Hellhounds |
| Opponents' Possible Spawns | |
|---|---|
| Seaside Mages | Seaside Magi, Monk |
| Hellhounds | Hellhounds |
In-game description: Hellhounds were known to hunt in the neighborhoods of this magic Burgh.
Map overview: The map is fairly open, there are small forests throughout. The West is covered by sea and the East is covered by a river. You start at the South East of the map, on the other side of the river with your portal. The Seaside mages start at the center of the map, in their "base", their portal is at the East of their base near the river, and the 3 Seaside mages start at different parts of their base. The Hellhounds start at the West, with their portal and 5 Hellhounds spread outside the Seaside Mages' base entrance.
Strategy: Don't do anything in the first turn. The only hellhound that can attack your chieftain will leave to attack the Seaside Magi; then you can capture the portal freely.
First, let the Magi and Hellhounds attack each other, then slowly advance with Black Knights swarming the hellhounds. When the hellhounds are defeated, spam the Mages with Zamorak Rangers. If you have Bridger, use it to give yourself a quick path to the Mages' portal.
If you want to get a gold medal, use the Bridger spell to create a quick pathway from your portal to the village that your Chieftain is on (right next to the original bridge). Do this on the 1st turn and then summon two werewolves. Send one Werewolf to the original bridge as far as it can go. Send the second werewolf down the bridge you created and make sure the Hellhound cannot reach it. On the second turn, summon another werewolf and then send the Werewolf on the left bridge to go the left of the Hellhound. Send the Werewolf on the right bridge to go behind the Hellhound and send the Werewolf you've just summoned to go the right of the Hellhound. Then, attack with all the Werewolves and finish it off with your Chieftain. Then send your Werewolves down towards the portal. Put one Werewolf on the track and simply capture the next two villages. After you've done that, send your Chieftain to the portal and surround him with your Werewolves. You should have the portal now. If this was done right, you should have the portal on turn 5 or 6. Then go for the hellhounds portal as fast as you can, then the mage's portal and you should get a gold medal score.
Another possible strategy can be found here:[1]
Note: It is worth mentioning that neither of the opponents will summon Barbarians, this level is far easier than it looks since you don't have to worry about your territory being invaded. The Hellhounds may be fast, but they can be killed by Black Knights, whilst the Seaside Mages only summon Mages and Monks, who are slow and can be killed by Rangers before they do anything. If a Hellhound is on top of the Mage's portal, don't kill him because I did that when they had 3.2k mana..
The Conquest of Hallowvale[]
- Difficulty: 4
- Reward: Greater Demon
| Starting Units | |
|---|---|
| Player | 2 Barbarian Chieftains |
| Saradomin | 2 Barbarian Chieftains, 1 Monk, 2 Paladins, 3 Saradomin Owls, 2 White Knights, 1 Lion, 1 Unicorn, 1 Centaur, Efaritay (Icyene) |
| Opponent's Possible Spawns | |
|---|---|
| Saradomin |
Barbarians, Paladins, Saradomin Owls, Saradomin Rangers, White Knights, Lions, Centaurs, Icyenes, Unicorns |
In-game description: Our time has come! Defeat Efaritay and her allies, and take over Hallowvale!
Map overview: This map is fairly open, in the sense that the forests do not block your way, the mountains are concentrated on the corners of the map. The track network is VAST, throughout the entire map and can be used to your advantage! You will be able to use the track for efficient movement of units from one area to another. There are 5 lakes/rivers throughout the map, 3 of which you pass/cross over.
You start at the far North corner of the map, slightly West. You have a portal and 2 Barbarian Chieftains. Saradomin starts with around two-third (2/3) of the map to himself. His army spread around the map.
Strategy: This may be the hardest level in the campaign. From the beginning to mid-game, Saradomin channels all his starting units towards your army, but later in game he summons mostly Icyenes. Saradomin will have a lot of mana sources, but don't let that intimidate you, he will spend it all on Icyenes. To reach Efaritay, you will go on a maze-like route.
It is important that you have the greater fire rain spell!
The most common (and advised) way to begin is to cast Shrine of Zamorak, summon a Zamorak Ranger and have one Chieftain rush to the nearest portal while the other one captures the towns. At turn 3 or 4, when Saradomins' small army (two Paladins, a White Knight and maybe an Owl) get passed the narrow gap between the mountains and river/lake at the South, use the Greater Fire Rain on them four. The Owl will die, whilst the White Knight and 2 Paladins will hover for some turns to heal themselves. They will delay their charge at you, use this delay to your advantage and grab the portal! Should you fail to capture the portal you will be unable to win.
From here on, focus on summoning rangers, black knights (equip one with Vampyric Blood!) and maybe mages to weaken white knights and lions. Hellhounds and Gargoyles can be also useful. You MUST balance the combat triangle (warriors, rangers and mages). After the bulk of Saradomins' charging army is dead, start summoning Necromancers since there will be a lot of bones.
Around this point Saradomin will spam mainly Icyenes, much to the exclusion of other units. And you should have a colossal army, mostly skeletons and rangers. Start swarming further South and East towards Efaritay. Use the Bridger spell onto the river/lake so that you don't cramp all your units into the narrow gap between the mountains and river/lake. Charge towards Efaritay and snipe her down, if she flees to the mountains on the South East corner, then capture the tower (Efaritays' Perch).
Notes: The Icyenes usually make sure they are in a position in which they can attack your forces the next turn. They seem to attack units randomly, they don't prioritize helpers. You may think you can use your helper as a bait, but 50% of the time they will target one of your Rangers instead.
Another strategy is to make 3 Gargoyles and have them fly along the mountains. Gargoyles can be attacked only by an Icyene while on a mountain. Once your 3 gargoyles are close enough to Saradomin's leader, have them snipe her.
Slayer Tower[]
- Difficulty: 5
- Reward: Gargoyle
| Starting Units | |
|---|---|
| Player | Nothing |
| Gargoyles | 5 Hellhounds, 1 Gargoyle |
| Opponent's Possible Spawns | |
|---|---|
| Gargoyles | Hellhounds, Greater Demons, Gargoyles |
In-game description: Conquer the denizens of the fabled Slayer Tower and bend them to your will!
Map overview: You start at the South West of the map, the "Gargoyles" start at the North East, opposite to your side of the map. There are many villages near your portal, some that at already captured, and others that are not. Whilst the Gargoyles team have a fixed mana income of 250 from the two portals and two towers, The are no other mana resources near them. Your side of the map is very open, with a brief network of tracks, whereas on the Gargoyles side, there are a lot of mountains and forests. You start with no units. The Gargoyles team will have 5 Hellhounds spread throughout the mountain areas, and a Gargoyle at the North East corner.
Strategy: This is somewhat easy even though the difficulty is high. The Gargoyles team will mainly summon Greater demons and occasionally Hellhounds, and rarely summon Gargoyles. The Gargoyle team will try to swarm your portal and block it. The key to this map is having a group of mages, a knight with Vampyric Blood, and a ranger or two. Another notable aspect is that they don't summon Barbarians.
This map can be completed in 12 turns with less than 100 damage earning a high score for this level. This is done by making a single Barbarian, and leaving it on the house farthest away from any Hellhounds. Then, cast Shrine of Zamorak and make a Black Knight. Cast Vampiric Blood on it. Cast Greater Rain Fire on the Hellhounds on the West side of the map. They should stop in their tracks to "heal". Use your Black Knight to kill the Hellhounds coming from the east. Summon a Mage to help. Afterwards, Summon a Mage, Ranger, and another Barbarian to take the rest of the houses. Summon your own to defeat the Hellhounds that are "healing". Send your other units towards their portals and try to block them. Defeat any Gargoyles or Greater Demons coming your way. Reinforce your troops if necessary. Send your Barbarians to take the portals once the area is secure or after you have taken every village. Send your Gargoyle (if you have one) to help block their portals or to kill the Hellhounds stuck on the side of the map. Victory is assured after you have taken both portals or killed both Hellhounds whilst blocking, with a Gold score of 1200+.
Note: A Skeleton wall (do NOT attack with Skeletons) with Necromancers behind them to heal/raise them is very effective. Use Rangers and Mages behind the Necromancers in case of Gargoyles.
Note: 12 Turns and 65 Damage with a score of 1318 is possible. Turn 1: Do nothing. Turn 2: Summon Werewolf to enter forest and attack Hellhound. Shrine of Zamorak. Summon Sea Slug to attack nearest Hellhound. Greater Fire Rain on Gargoyle + Greater Demon. Turn 3: Summon your own Greater Demon onto uncaptured village closest to enemy forces. Turn 4: Attack the strongest Hellhound surrounding your demon, and then use Vampyric Blood on it. Turns 5+: Keep picking on the strongest Hellhound with your demon while summoning Gargoyles whenever possible to deal with the greatest threat to your vampyric Greater Demon.
The Fall of Senntisten[]

- Difficulty: 5
- Reward:
 Pyrelord
| Starting Units | |
|---|---|
| Player | 1 Barbarian Chieftain |
| Saradomin | 3 Barbarian Chieftains, 3 Monks, 1 Saradomin Owl, 3 Paladins, 6 Saradomin Rangers, 3 White Knights, 1 Saradomin Mage, 2 Unicorns, 3 Centaurs, 2 Lions, 2 Priests |
| Zaros | 2 Necromancers, 2 Zaros Rangers, 1 Black Knight, 4 Zaros Magi, 3 Hellhounds, 2 Greater Demons, 2 Gargoyles, 1 Pyrelord |
| Opponents' Possible Spawns | |
|---|---|
| Saradomin | Barbarians, Monks, Saradomin Owls, Paladins, Saradomin Rangers, White Knights, Saradomins Magi, Unicorns, Centaurs, Lions, Priests, Icyenes |
| Zaros | Barbarians, Werewolves, Necromancers, Skeletons, Zaros Rangers, Black Knights, Zaros Magi, Hellhounds, Greater Demons, Gargoyles, Pyrelords |
In-game description: The last remnants of Zarosian followers are gathered at the temple of Senntisten. Let's destroy them and any Saradomin forces that may be infiltrating the area.


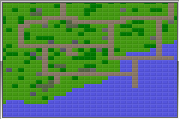
How the level looks at the beginning.
Map overview: The sea covers the South boundary, the mountain range starts from the North East corner, all the way to the South East. There are some mountains paralleling to the sea. There is a dispersion of forests throughout, but aside from that, the map is open. There are two networks of tracks, one that goes though Zaros' base and Saradomins starting area, and the other one at the East of the map, in the mountain range.
You start at the East of the map, within the mountain ranges. Zaros starts at the center of the map, in his base which hosts the key temple/tower. Zaros' starting units are all behind the walls of his base. Saradomin starts with a colossal army, covering the North and West sides of the map. Saradomin has almost every of his units out there, except Icyenes.
This is an easy level if you have finished all the other levels. Although Zaros and Saradomin start with a high mana income and colossal army of powerful units, their army will be reduced to bones because of their fight. Later in the game, Saradomin mainly summons Icyenes, whist Zaros mostly summons Necromancers and Pyrelords. But Zaros won't always be predictable about what he summons, he occasionally summons strong combat units if you come close to his portal.
Another point worth mentioning is that Zaros will mostly be behind the surrounding walls (his base), and will aim to expand his army outside along with an army of skeletons. Whilst Saradomin will try persistently to charge into the Zarosian base. They both will be distracted in their fight, leaving corners deserted, use this opportunity to grab mana sources. Its also notable that Zaros pays too much attention toward the North and West entrance (where Saradomin attempts to enter), he completely ignores the South entrance, where you have the isolated portal. Though later in the game Zaros does send a Barbarian South over there to capture the isolated portal. Do not let that happen, get that isolated portal before he acknowledges it.
Strategy:
Let the original portal you have be portal A, the one at the top B, Saradomin's upper portal C, lower portal D and the isolated one behind Zaros be E.
Cast Shrine of Zamorak on the first turn and summon a ranger from Potral A to accompany your chieftain up to Portal B. Watch out for the monk and owl, and kill them with the ranger. Capture the portal and pull in a couple of rangers and knights, and a spare barbarian to capture the villages (a necromancer and hellhound can be useful, instead of a knight). Make your way quickly towards Saradomins' Portal C, don't worry since Saradomin will spend all his mana on Icyenes, and you can take them down easily.
By the time you have Portal C, Saradomin will either have Portal D still, or be defeated because of not capturing it and losing Barbarians. Either ways, he will be hamstrung, basically defeated, and by then you should have Portal E, and start forming an army to take out Zaros.
Zaros won't be a big threat in reality, because looking at the layout of his base, his portals and key building are very close together at the South East corner of his base, not far from the South entrance. To achieve a highs score, DO NOT engage in the bulk of Zaros' army, Zaros will lose after you capture his key building.
The conquest can be done by sneaking barbarians and rangers through the South entrance of the base. Summon 2 Gargoyles, one from portal A, and another from portal E, move them towards Zaros' base, and then in one turn, block both portals. Zaros won't be able to fight back because he won't have any unit capable of taking out the Gargoyles, and the bulk of his army (Skeletons, Necromancers, Werewolves and Pyrelords) will be concentrate far away, at the North and East entrance, trying to fight off Saradomin at Portal D. Use the Bridger spell over the lake/pond in the South East of the base, and send you army to capture the key building. In each turns when you can, spam a Gargoyle into Zaros's base to help fight against any Zaros units that may try to approach/defend the key building and portals.
Notes: Keep capturing villages until there are basically no more to reach. More mana means more units, and spamming Rangers and Gargoyles with some Knights and Mages in between is the most effective strategy.
Also, avoid direct confrontation in the upper section of the walled part of the map where Saradomin and Zaros have a slaughter fest before you capture Portal C. The casualties will be appalling wherever you engage in direct confrontation with both opponents in the same place. Let them fight. They will be distracted by each other.
Rangers should focus on flyers, healers and Barbarians. Mages should focus on warriors and flyers. Gargoyles should focus on anything and everything besides Rangers. Knights should focus on getting rid of weaker warriors and Rangers.
Always attack Pyrelords with only Gargoyles, and only use the long range attack. This way, the Pyrelords will never be able to attack your units, thus slashing the damage you take. Always check the range of the Pyrelord and get everything out of its way; ditto for heavy warriors.
Tip: An Icyene can fly 8 squares and as Saradomin's Mana usually is around 400, Saradomin can only buy one Icyene every 2 turns (it costs 800 mana). When going for Saradomins portal (C) ensure you keep that much distance between the portal and Saradomin's villages and when the Icyene turn is past snipe it with Rangers and take villages in the cooldown period.
Achievements for this campaign[]
| Image | Achievement name | Requirements | Orb Points | Orb Coins | Members Only? |
| Zamorak's Supremacy | Complete a level from the Zamorak Returns campaign without losing any units. | 200 | 2 | No | |
| Zamorak's Silver | Achieve a silver medal score on all missions in the Zamorak Returns campaign. | 300 | 3 | No | |
| Zamorak's Gold | Achieve a gold medal score on all missions in the Zamorak Returns campaign. | 500 | 5 | No | |
| Plucking Feathers | Defeat Efaritay and take over Hallowvale. | 300 | 3 | No | |
| Push to the East | Reach the eastern shores and conquer the port there. | 300 | 3 | No | |
| Zarosian Purge | Bring down the last Zarosian resistance at Senntisten. | 500 | 5 | No |
Trivia[]
- In Latin, Cave Canem means "Beware of Dog".
- In the campaign advertisement, it says "While Guthix sleeps, with Zaros cornered, Zamorak returns". This may be reference to the Grand master quest in Runescape "While Guthix Sleeps". It could also mean that Guthix is not involved with the campaign in any way, with exceptions in Cave Canem, Port Phasmatys and the Mage Arena, when the team uses Guthixian forces.
- Zaros used to use Zamorak Rangers and Zamorak Magi, even though he isn't Zamorak but due to a hidden update on December, they have been fixed to Zaros Magi and Zaros Rangers.
- In Conquest of Hallowvale, Saradomin starts with a lion, a unicorn and a centaur. This may be a reference to Starlight, Growler and Bree, Commander Zilyana's (who happens to be an Icyene) bodyguards in the God Wars Dungeon of Runescape.
- Although this campaign is of Drakan and his vampyre's invasion of Morytania, you do not have any vampyre unit or anything to do with vampyres in the campaign.
- Although in Runescape the Darkmeyer region and the Icyene graveyard were added no extra campaigns were added to the Zamorak Returns, nor was the map changed.
- In Port Phasmatys, Saradomin starts with a Saradomin mage (who gets taken over by the sea slugs). This may be a reference to Necrovarus, a priest and mage who helped protect the people of port phasmatys by making a spiritual barrier that prevents vampires from entering the hamlet port.
- It is possible the Desert mages and the Seaside mages were once rivals / enemies / mage competitors, who were aware of each other, due to their locations not being far from each other, the desert Mage arena and the Burgh. The desert mage arena still exists in Runescape (known as the Mage Training Arena), however in its history, it was destroyed by Freminnik tribes, not Zamorakian forces. Whilst in the Burgh (Burgh de Rott) in Runescape, there is no evidence of there ever being magical activities or presence. However, Burgh de Rott was nonetheless an important town back then before the fall of Hallowvale.
- In Crossing of the Salve, Saradomin starts with a Priest, this could be a reference to Drezel, the monk of Paterdomus.