
| |
| Genre | Shooter |
|---|---|
| Release | May 21, 2008 |
| Multi-player | No |
Hostile Spawn is a shooter game released on 21 May 2008, 3 months after the website's original release. It received a major update on the 13th of January 2010.
Kerrus Levels
Introduction
Destination – Kerrus
20 days ago, we received what appeared to be a distress call originating from the Kerrus Research Base.
The military transport Hammerhead was sent to determine what had happened. Since its ETA on Kerrus, the Starship Hammerhead has failed to report on its mission, and we have been unable to re-establish contact. Discontent has become a serious problem among UFE personnel in recent years, and the possibility of insurrection has not been ruled out.
At the Senate's request, we are dispatching you to Kerrus. Infiltrate the Hammerhead and regain control over the ship and crew. Then ensure that the Hammerhead's mission on Kerrus is completed.
Good luck, marine.
1 - Power Cut
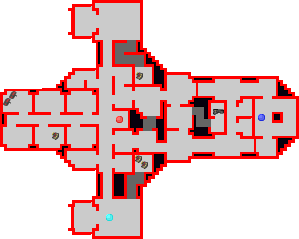
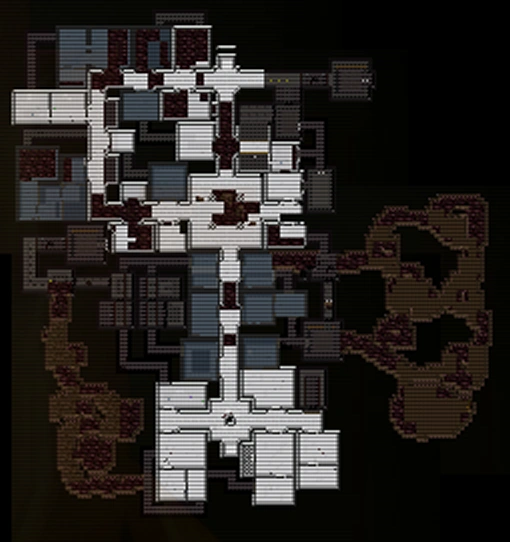
- You have boarded the Hammerhead. Your task is to locate the command deck, secure the black box and evac back to your shuttle. Scanners have confirmed that the ship's primary power is offline. Head to the reactor room and reactivate the power supply to the lift, then proceed to the flight deck. Scanners have also detected movement on the vessel. Your standard issue auto gun should see you through any hostile situation.
- Good luck, marine.
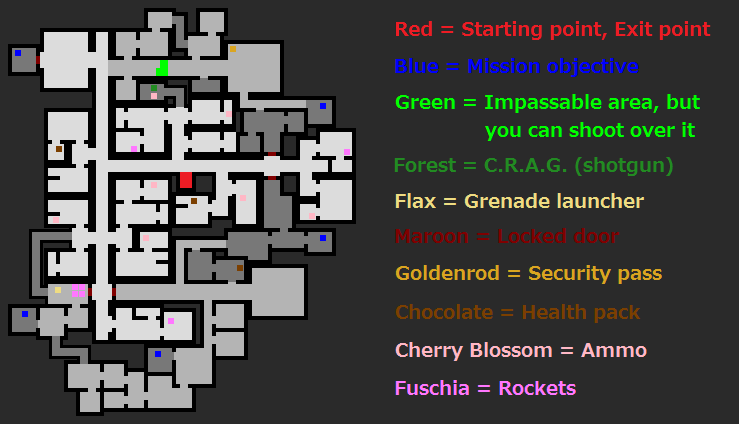
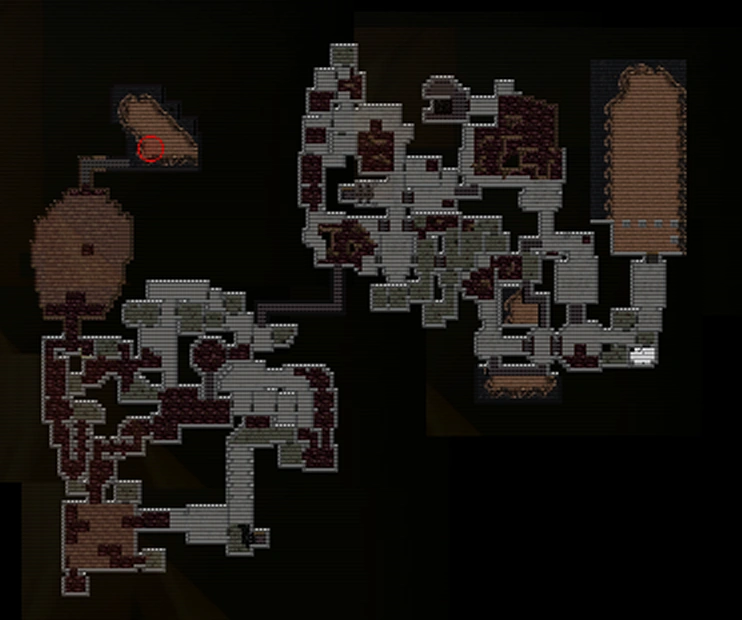
The cyan dot is the starting point; the blue dot is the mission objective; the red dot is the exit. This level only has seven aliens to kill.
2 - Control
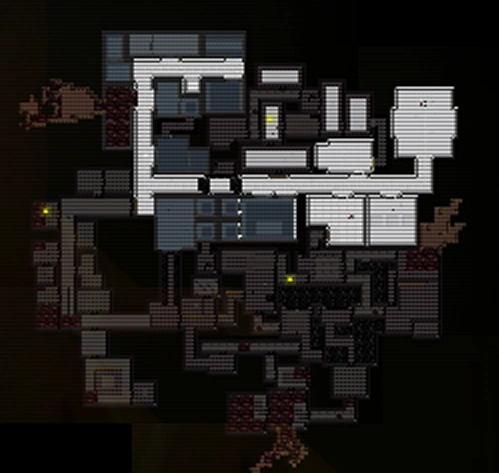
- The flight deck of the Hammerhead seems to be full of life signatures. Fight your way to the bridge at the front of the ship, then return to the lift with the black box.
- The ship's sensor array has picked up a large object moving towards the vessel, so be quick.
- Sensors have also detected a powerful Close Range Assault Gun (C.R.A.G.) - try to locate this, if possible.
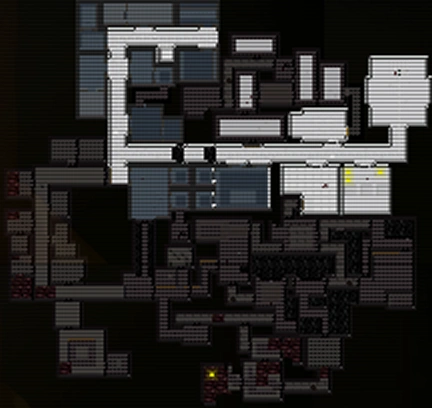
The cyan dot is the starting point; the blue dot is the mission objective; you must then return to the starting point.
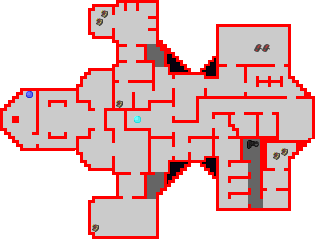
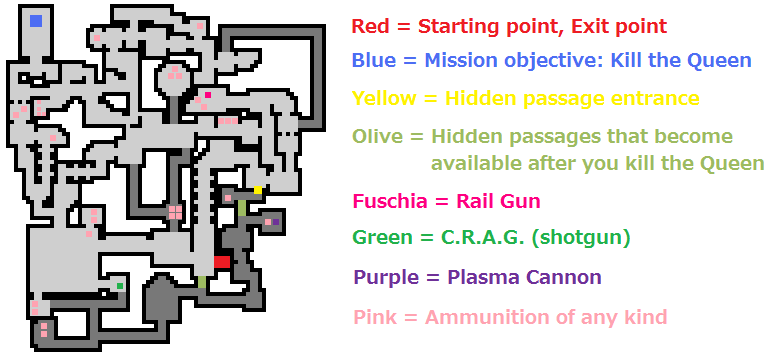
3 - Self Destruct
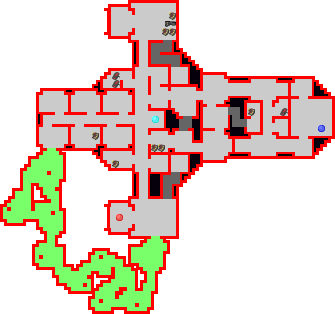
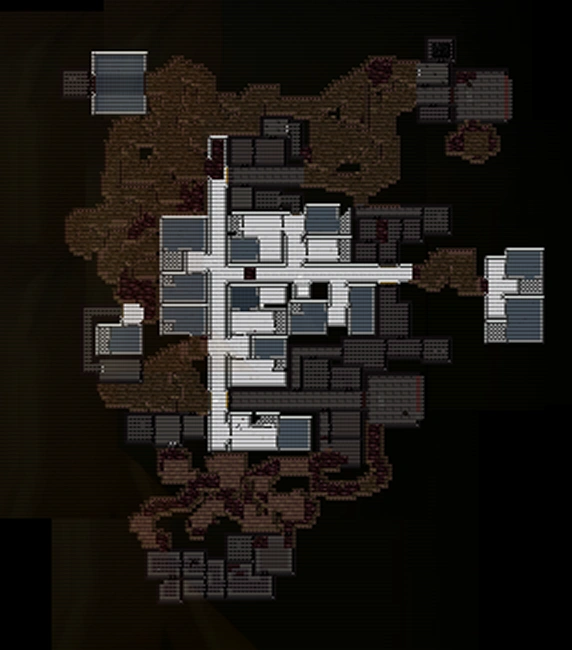
- The black box has provided the location of the spawn's hive on the planet's surface. Before dealing with that, though, we cannot allow the derelict Hammerhead to drift into populated space. You must destroy the ship by damaging its reactor. After taking it out, make your way back to your shuttle. You will only have a short amount of time before the ship explodes, so be quick.
- There is also a large alien object heading for the ship - it must have detected the reactor coming back online. Expect high resistance.
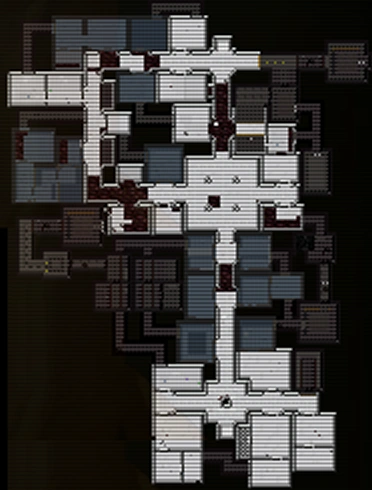
The cyan dot is the starting point; the blue dot is the mission objective; the red dot is the exit.
Note that the green area becomes accessible only after you destroy the reactor. Before you enter the green area, it is advised you equip the flamethrower as your secondary weapon as there will be a large group of aliens that will sprint at you as you enter.
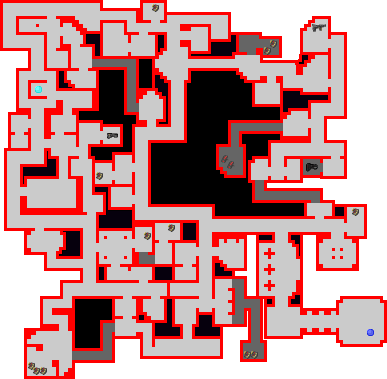
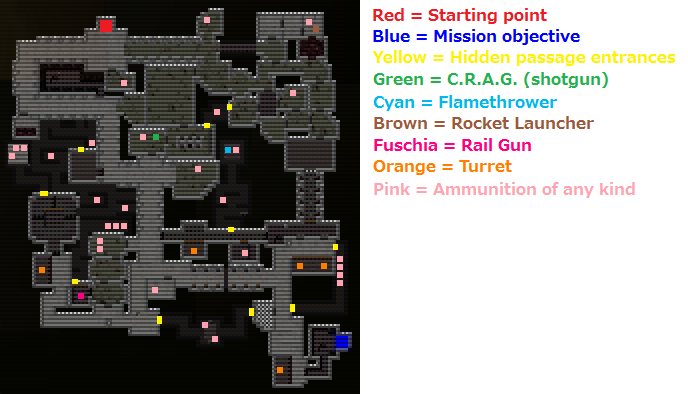
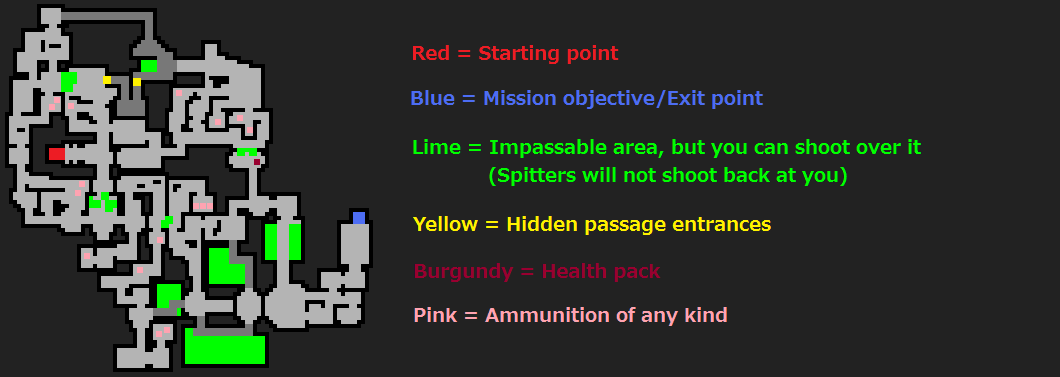
4 - Entrance
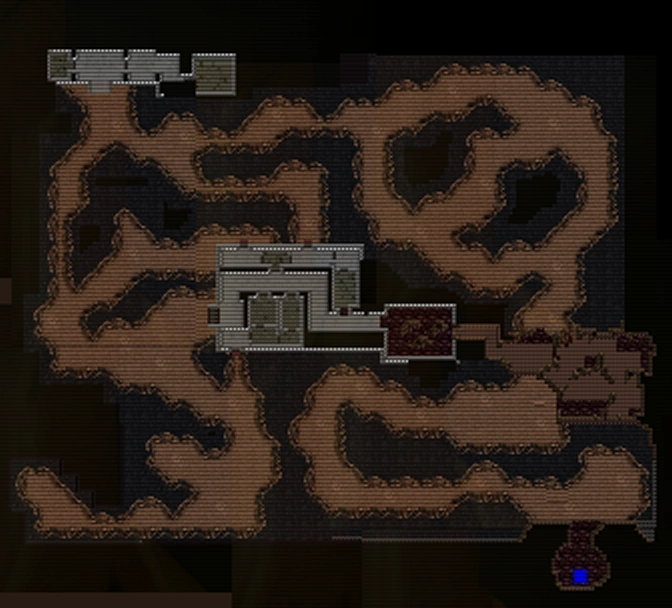
- Your shuttle was caught in the Hammerhead's explosion and has crash landed. The crash has also damaged your weapons and ammunition supply, so you will have to make do with the standard issue auto gun stored in the backup locker. A surface scan has revealed some ammunition caches scattered around the crash site. These are shown as yellow dots on your scanner readout.
- Due to the number of hostile aliens on the surface, it is important that you reach the lift into the base as quickly as possible.
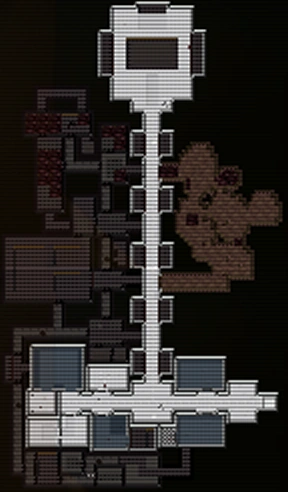
The cyan dot is the starting point; the blue dot is the mission objective.
Note that the barrel icons in most cases represent more than one barrel. It is possible to get out of the map in this mission by going up from the start point, all the way left, blow up the barrel, then go down and right. There is a rock way that looks like a top right piece of a circle. It is possible to go through it and exit the map by it. Beware that aliens still spawn there and touching the edge of the map does nothing. In Hard Mode, the bottom-middle section contains a C.R.A.G. available for you to pick up.
5 - Destruction
- Your task now is to seal the entrance to the base, so the aliens on the surface cannot get in. Head to the reactor and take it out. This should protect your back as you make your way towards the hive. As on the Hammerhead, the reactor will detonate a short time after being damaged, so be quick to get out.
- Sensors have also picked up a C.R.A.G. close to the deck lift - try to find it to help combat the enemy.
The cyan dot is the starting point; the blue dot is the mission objective; you must then return to the starting point. Directly south of your starting point, there are two aliens. If you head north up the hallway, when you turn a second time to reveal some dark areas, very close to you will be an alien.
6 - Security
- Watch out while your try to make your way to the lift on this level. The base's security systems have malfunctioned due to the spawn.
- The turrets are slow tracking, but powerful, so it is a bad idea to run past them. Use EMP rockets to disrupt them, allowing you to pass by safely. There is a rocket launcher and a cache of rockets in the weapon storage area. Head there first.
The cyan dot is the starting point; the blue dot is the mission objective.
This level introduces turrets, which keep up a heavy rate of fire. It is recommended you do not start at this level (unless you are skilled or going for Golden Turret) because you will want at the beginning of the level a strong weapon to defend yourself from all the aliens that come at you.
There is a plasma cannon on this level, which can be useful for the next levels as it is almost definitely required to destroy the Queen on level 9.
7 - Infiltration
- You are reaching the entrance to the hive, so resistance is likely to be strong. Be on your guard for security turrets and heavy spawn activity. Your scanners have also picked up information regarding the location of a railgun on this level. This advanced weapon is capable of penetrating multiple hostiles in one shot.
- If things become too hot to handle, blow the level's reactor to turn off the turret's power, then run for the lift.
Walkthrough:
You'll start at the northernmost point on the level, if you look at the map when you load the level briefing. Destroy two aliens around this area, and run right. Kill a few more, and you should find a "cell" pack. Nab it - you'll want it later. Now head a bit further south.
You should see a room with two turrets and some aliens. Instead, head west and destroy a turret here using the explosive barrel; a technique you should have learned from the previous level. If you look around this area, you'll find some more cell packs and a railgun. Get the railgun and head back.
To deal with the room with the turrets (you'll have to do this) use the railgun to knock out the turrets, one at a time. Head into this room, blast some more aliens and another turret, and head into the last room.
The eggs in this room, when destroyed, let out some baby spawn. They are unable to open doors, but are just as deadly as older ones. They count 1 each on your kill count, but only 25 points on your score. Blast a path to the lift and exit the level.
8 - The Hive
- You have reached the hive. Locate and destroy the clusters of spawn eggs hidden around the area. Their locations are indicated on your scanner by red dots. After destroying the eggs, head back to the lift.
- Don't rely on your initial scans of this area's layout, as the spawn are known to create tunnels and block passages for their own purposes.
- Good luck, marine.
When you first start, you will immediately be attacked by a swarm of aliens from the front. So as soon as the level starts, shoot your Auto Gun, unless you have a better gun such as the Rail Gun, then you can kill them like normal. Mission objective is to destroy all eggs on the level; once you destroy them all, more aliens will spawn on the level. Go back to the lift to finish the level.
9 - Regicide
WARNING: IF THE QUEEN DESTROYS THE LIFT, YOU CAN NOT PASS THE LEVEL
- The queen has been located. This is your chance to destroy the source of the spawn eggs.
- Fight your way to the queen's nest and terminate her with extreme prejudice. Once she has been killed, get out of there. Her death will definitely aggravate the hive.
In this level you have to find the queen and kill it with your guns and then you have to go back to the lift. When you first start, a swarm of aliens will come from the north. Then, if you go due west of the lift, you'll get attacked by two more swarms; one from the west, and one from the north. It's recommended you kill the queen with either the Rail Gun or the Plasma Cannon (or Rocket Launcher if you can spare the ammo). She doesn't have any ranged attacks, moves slow, but EATS WALLS. That's right, even if you ran all the way across the map, she'd eat her way to you. She'd probably eat the lift too. Once you kill the queen, more aliens will spawn on the level. Once the new aliens spawn, it is reccomended to switch to the flamethrower or railgun, if you have them.
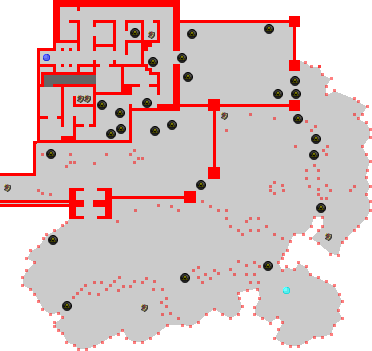
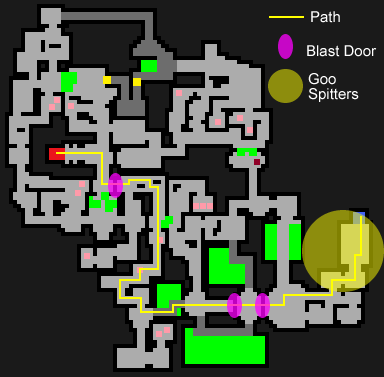
10 - Escape
- The death of the spawn queen has caused the hive to erupt in furious anger. The turmoil must have damaged the base's primary reactors and the whole area is about to explode.
- Find an exit to the surface and get out as fast as possible. It is unlikely that you will have enough ammo to defeat the whole hive.
- Flee while you can!
The quickest path to complete this level involves destroying blast doors with heavy weapons such as the railgun or rocket launcher (obtained from previous levels). Blast doors can be destroyed with three railgun shots or two rockets. If you do not have either weapon listed above, then you can also take the long way, through secret passageways and around the blast doors. Near the exit, there are around 15 goo spitters that can easily kill you if you get hit. (See picture below for best way to complete level.)
For the spitter army, you can:
- kill the normal alien amongst them and run through the rest (high rank recommended as they will still shoot at you).
- lure them and take the lower passage (thus avoiding all of them).
- wait for them to align together and shoot them with a railgun.
- run back and shoot them all with a plasma gun.
- charge through them with a flamethrower (by far the easiest method).
Hard Mode
Hard mode is unlocked on completion of normal mode. It always starts at level 4 and imposes a strict time limit per level. Enemies move faster and do more damage than normal. Gameplay could be considered similar to running the gauntlet of facing large numbers of enemies at a faster rate than usual. There are some easier things, however; some levels have extra ammo or items placed. For example, the Security Level (level 6) has 18 rockets in the room Northwest of the starting location. In addition, gaining rankings is much quicker in hard mode due to the strong need to kill the enemies extremely quickly, and the higher scores given for defeating enemies.
Vengeance Levels
Members have access to the Vengeance level set. This introduces new locations, new kinds of creatures, new achievements, and more weapons. The Vengeance set was introduced with the major Hostile Spawn revamp on the 13th of January 2010.
Introduction
Date – uncertain
Position – planet designated Kerrus
I was sent to investigate the loss of contact with the UFE Starship Hammerhead. I found out it had been taken over by hostile non-terrestrials. None of the crew survived.
I blew it up and escaped, but my shuttle crashed on the planet Kerrus.
Kerrus was infested by the creatures. I found the centre of their hive and destroyed the queen, but I barely got off the planet alive.
The nearest human colony is too far away to reach, but there's supposed to be a space station nearby. I don't know where it is, but maybe if I go into hypersleep the oxygen will last long enough to get there.
If not, whoever gets this message, please notify the UFE urgently that Kerrus is unsafe and must not be approached.
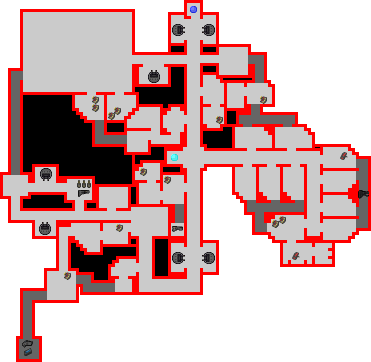
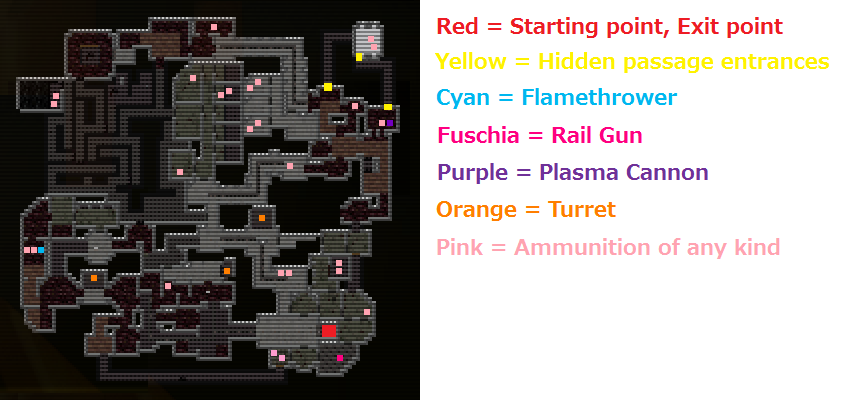
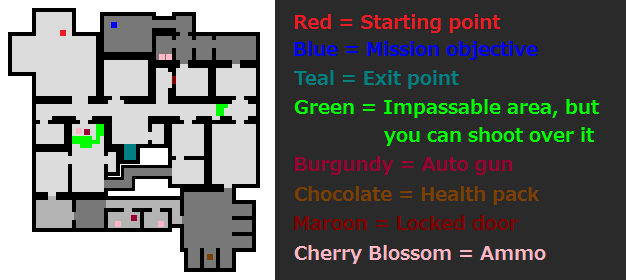
1 - Medical
- After escaping from the infested research base on Kerrus, you awake in a hospital bed. Explore and find out why there is nobody here. You rue the loss of your weapons: But at least you have your trusty pistol.
2 Auto guns on this level for some reason. Make your way to the control terminal at the top of the map, and take a shortcut through the previously locked door to the lift.
2 - Lockdown
- The lift abruptly halts. The security systems have shut it down. A helpful sign inside the lift says that in the event of lockdown, the lift can be reactivated by overriding the security systems at five consoles on this level.
- They could have made this simpler.
Grab the shotgun north of the starting point, being careful of the orange alien guarding it. Then grab the Security pass in the upper right corner to open the locked doors, unless you're trying to get the "B and E" achievement, in which case, you'll have to go to the lower left corner to grab the Grenade launcher in order to blast open the locked doors. Once you activate all 5 security consoles, more orange aliens will spawn on the level, so be wary.
3 - Breach
- There is a hull breach on this level.
- You'll have to deal with it before you can continue. If you activate the reactor on this level it will strengthen the breach shields.
- Alternatively, you could divert the oxygen distribution and seal off the affected area from the environmental console.
4 - Infest Station
- Scanners indicate a large alien presence on this level, but you'll have to pass through it to reach the lift to the lower levels.
This level introduces giant guard aliens. You cannot destroy it with your own weapons; you will have to blow it up with a reactor. Or you can just ditch it somewhere.
Walkthrough
Requirements:
- Rank of technician or above is recommended
- C.R.A.G or better (this level can be done with the auto gun but it is very hard)
- Grenade launcher
- 100+ ammo for C.R.A.G of 1000+ auto gun ammo
- you only need 1 grenade launcher ammo but keep 4 extra in case.
Method:
- Fight your way to the reactor on the east.
- Pick up ammo and go to the guard alien.
- Lure him to the reactor them blow it up with the grenade launcher. (note. you may die at this part)
- Follow the arrow to a console to turn the lights on.
- Pick up the railgun in a room with 2 aliens guarding it and with a machine blocking your way to reach it directly.
- Follow the arrow until you reach a place with 2 turrets.
- Destroy both with the railgun.
- Continue following the arrow until you reach the lift.
- you will encounter another two turrets. Just kill them with the railgun.
When the lights are out, just make a mad dash to the console.
5 - Bridge
- The station is too heavily infested to be saved. Reach the nav controls on the bridge, and set a course to crash on the planet.
6 - Nightmare
- The infestation on this level is worse than ever, but you have to pass through it again. Hopefully you will not encounter any more giant guard aliens before you can reach the lift.
There will be a screen blocking your way into the rest of the hive. To get through it, hit it twice with a rocket launcher, obtained from the room on the left or from previous levels.
There are 3 reactors and 3 Guards on this level. You can use the first reactor to kill the first Guard, and kill the other two Guards with one other reactor, leaving one intact.
Most of the layout of this level is the same as level 4 (Infest Station).
7 - Invasion
- The alien infestation has completely taken over this level, You need to halt the incursion or you won't make it off the station. According to the manifest, this level has explosive charges that should be sufficient to block off the points where the aliens are getting onto the station. Find enough charges and set them to destroy the points of ingress before you leave the level.
There are 4 charges on this level, but you only need 3. If you want Gordon's Alive, then pick up all 4 and use the last one at the back of the Spawn Queen's base on level 10.
Most of the layout of this level is the same as level 3 (Breach).
8 - Torment
- This level has two shuttle bays, each of which may provide you with a means of escape, if the alien infection has not already taken over the shuttles.
9 - Planet-side
- You touch down safely on the only planet in range: the infested world on Kerrus. You cannot stay long on the surface; you will have to find your way back to the research base and hope that the alien spawn has diminished since your last visit.
Maximum score : 33100
10 - Hostile Revenant
- Your scans of this level explain why the spawn population has climbed so high: There is a spawn queen on this level. You may be trapped without hope of escape, but you know you must at least destroy the Queen before the inevitable end.
There are sevearl ways to defeat the Vengeance Queen. The easiest involves using the combination Railgun and Plasma Rifle until 3/4ths of her tail is gone. This allows you to take the tail down quickly with the Railgun, as well as deal with the other aliens using the Plasma Rifle. During this time you should be firing one or the other gun the entire time, and running in large circles around the queen to avoid her attacks.
Once her tail is down to less then 3/4ths of what it started out being, switch from the Rail Gun to the Rocket Launcher. The Rocket Launcher has a backfire that will bounce you backwards if you hit a target too close, allowing you to keep your distance from the now-much-quicker queen. Your primarily goal should be avoiding her, and shots to the tail should now be aimed rather then just spraying in the general direction.
After she reaches less then 5 eggs left on her tail, switch from the Plasma Rifle to the Flamethrower. The Flamethrower-Rocket Launcher combo should take you to the end of the tail. Aim with the Rocket Launcher either at the queen for the bounceback or at the tail for damage. Use the flamethrower to deal with anything that comes after you, as, if you've played the from the very start, you'll have at least 100+ flamethrower cartridges.
Once the tail is gone, spray the queen with fire. She'll die in about one hit, exploding into a shower of spawn. This can be dangerous if your at low hp, so once the tail is gone be sure hold down the flamethrower trigger until you're sure everything in the area is dead.
Reactors
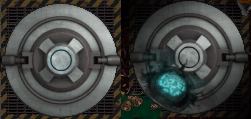
Some of the Kerrus levels call for you to destroy a reactor. Reactors can only be destroyed by heavy weapons (i.e. railgun, plasma cannon, rocket launcher, exploding barrels), akin to a turret or blast door. Destroying the reactor will turn off any turrets on the level, but will explode in a few minutes, giving limited time to complete the objectives. Sometimes destroying a single reactor dims the lights in Vengeance levels. Destroying all reactors in some Vengeance levels will result in death.
Reactors are listed here:
-The first reactor appears on level 1 ("Power cut"), but cannot be destroyed
-The second reactor appears on level 3 ("Self Destruct") and must be destroyed (only with the barrels around it)
-The third reactor appears on level 5 ("Destruction") and must be destroyed (only with the barrels around it)
-The fourth reactor appears on level 7 ("Infiltration") and can be destroyed (only with the railgun, rocket launcher or plasma cannon)
-The fifth and final reactor appears on level 8 ("The Hive") and can be destroyed (only with the railgun, rocket launcher or plasma cannon)
NOTE: Even if the reactor on level 8 is destroyed, you still have to kill the larvae.
NOTE: Destroying reactors will make your gauge fill up a considerable amount. This amount is equal for all ranks, so destroying reactors is very helpful for leveling up.
Enemies
| Fan name | Current Appearance | Description | Level (Kerrus) | Level (Vengeance) | Points (Normal Mode) | Points (Hard Mode) |
|---|---|---|---|---|---|---|
| Alien | Moves towards the character; current version does 'sprint' to a degree towards you. The old version dealt large amounts of damage upon contact due to it being difficult to escape once it touches you, but the current version does not 'grab' you. Cannot be walked through. | All levels. | All levels. | 50 | 100 | |
| Fast Alien | Moves towards the character very quickly if it sights you. Like normal aliens, but red and slightly faster, unlike the old version which was much faster. Can often be found in secret passageways. Like the normal alien, it cannot be run through, unlike previously. Seems to also do slightly more damage than normal alien. | First appears on Security. | First appears on Breach. | 50 | ||
| Egg spawn | Small creature that usually appears from inside an 'egg'. Because of its small size, it cannot open doors, but can sometimes 'go under' walls and doors. It will also do as much damage as a mature alien. Can be walked through. | First appears on Infiltration, but they are found mostly on The Hive and Regicide. | First appears on Breach. | 25 | ||
| Goo Spitter | Moves towards you at a speed slower than normal aliens do and does not sprint. Rapidly fires green 'splodges' at you. Can be walked through. It sometimes splashes its goo onto you to hurt you. | First appears on The Hive. | First appears on Bridge. | 100 | ||
| Guard |  |
Follows you. Cannot be killed with weapons. To kill it shoot a reactor near it. If you "damage" it enough, it'll back away for a little while, then continue chasing you. Will stop following you if you get far away enough from it. With flame-thrower it knocks the guard back. | Not found on Kerrus. | First appears on Infest Station. | 250 | |
| Kerrus Queen | 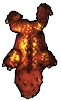 |
'Boss' of Kerrus levels. Can destroy walls to follow you. | Regicide. | Not found on Vengeance. | ||
| Vengeance Queen | |
'Boss' of Vengeance levels. Has a 'tail' of spawn eggs that slows it down. As the eggs burst, the Vengeance Queen gains speed. | Not found on Kerrus. | Hostile Revenant. |
Weapons
For a more detailed description of the weapons: See Hostile Spawn/Weapons.
| Image | Name | Ammo | Description |
|---|---|---|---|
| N/A | Pistol | Fires at a slow rate. It fires three bullets for every round it has before it is 'reloaded'. If one of your weapons run out of ammo, you will revert to using your energy pistol instead. This weapon has infinite ammo but a very slow rate of fire, so try not to rely on it. Try to keep ammo stocked for the better weapons. It is also the starting weapon for the Vengeance levels. | |
| Auto Gun | The marine's standard issue auto gun has a long range and efficient ammo use. It acts as a machine gun. | ||
| Close Range Assault Gun (C.R.A.G.) | The C.R.A.G. provides heavy stopping power for dealing with nearby targets. Accuracy and damage at range is very low. It works somewhat like a shotgun. | ||
| Flamethrower | The Flamethrower is highly effective against larger organic targets, but burns up fuel extremely fast. It is best used as a backup weapon in tight situations, such as being cornered by a large group of normal aliens and fast aliens. | ||
| Rocket Launcher | The rocket launcher fires electromagnetic pulse (EMP) rockets that instantly disable electrical equipment. The blast is also reasonably effective against groups of organic targets. | ||
| Grenade Launcher | The Grenade Launcher takes explosive ammo, and sets it to detonate after a time delay instead of an impact. It is very useful for clearing small rooms with the minimum personal risk, but less useful in open spaces. | ||
| Railgun | The railgun is powered by fuel-cell packs and accelerates a narrow slug up to speeds of Mach 40. It is designed to penetrate multiple targets over great distances with each shot. Kills aliens in one shot except for Kerrus Queen, Spawn Queen, and Guard aliens. Eggs will still spawn larvae if shot with a railgun. | ||
| Plasma Cannon | The plasma cannon is the pinnacle of military technology. The plasma ball that this weapon fires explodes in a short-ranged β-ray blast that can boil targets even through walls. It is very strong; it takes about two or three shots to kill a single alien. |
Rankings
- When you kill aliens you will see a thin yellow gauge filling up, when you kill enough aliens the gauge will eventually be full and then you will get a better rank and a health boost. If you play through from the first level, the gauge will empty slower. If you start midway, the gauge will empty faster.
- NOTE: If you kill aliens fast enough your rank will fill up at an extremely high rate and you will be gaining ranks very rapidly, but over time your gauge will empty again (you won't get demoted). This is a very good technique for getting the rank of "Lone wolf" (Starship Marine achievement) or "Scourge elite" (Starship Commando achievement) because when you start at a certain level you can use this technique so you don't have to play longer to get the same rank.
Rank table
| No. | Name |
|---|---|
| 1 | Civilian |
| 2 | Draftee |
| 3 | Rookie |
| 4 | Technician |
| 5 | Squaddie |
| 6 | Engineer |
| 7 | Sergeant |
| 8 | Marine |
| 9 | Commando |
| 10 | Elite Soldier |
| 11 | Lone Wolf |
| 12 | Elite Wolf |
| 13 | Hero of the UFE |
| 14 | Elite Hero |
| 15 | Slayer of the Spawn |
| 16 | Slayer Elite |
| 17 | Scourge of the Spawn |
| 18 | Scourge Elite |
| 19 | Spirit of the Hammerhead |
| 20 | Spirit of Vengeance |
Achievements
Total Achievements: 40
Total Orb Coins: 135
Total Orb Points: 13500
[Secret Achievements] | [Hidden Achievements] [Halloween Achievements]
| Image | Name | Requirement | Orb Points | Orb Coins | Members? | Sorter |
|---|---|---|---|---|---|---|
| Starship Trooper |
Complete the Starship levels (Kerrus levels 1-3) |
100 | 1 | No | AA | |
| Alien Bane |
Locate the spawn hive on Kerrus level 7 (Infiltration) |
200 | 2 | No | AB | |
| Starship Warrior |
Unlock Kerrus hard mode by completing the campaign |
500 | 5 | No | AC | |
| Starship Commando |
Reach the rank of "Scourge Elite" |
1000 | 10 | No | AE | |
| Eat This! |
Kill thirty aliens with the C.R.A.G (Close Range Assault Gun) |
100 | 1 | No | AF | |
| Pyromaniac |
Kill thirty aliens with the Flamethrower |
100 | 1 | No | AG | |
| Giblet Maker |
Kill thirty aliens with the Rocket Launcher or other explosives |
100 | 1 | No | AH | |
| Sniper |
Kill thirty aliens with the Rail Gun |
100 | 1 | No | AI | |
| Blaster |
Kill fifty aliens with the Plasma Gun |
100 | 1 | No | AJ | |
| Cool Killer |
Kill five Aliens with one shot with the rail gun |
100 | 1 | No | AK | |
| Golden Reactor |
Complete Kerrus level 5 (Destruction) from an auto gun start |
200 | 2 | No | AL | |
| Golden Turret |
Complete Kerrus level 6 (Security) from an auto gun start |
300 | 3 | No | AM | |
| Golden Claw |
Complete Kerrus level 7 (Infiltration) from an auto gun start |
300 | 3 | No | AN | |
| Golden Egg |
Complete Kerrus level 8 (The Hive) from an auto gun start |
500 | 5 | No | AO | |
| Golden Queen |
Complete Kerrus level 9 (Regicide) from an auto gun start |
500 | 5 | No | AP | |
| Golden Gun |
Complete Kerrus level 10 (Escape) from an auto gun start |
1000 | 10 | No | AQ | |
| Phoenix Nova |
Find the Phoenix Nova |
1000 | 10 | Yes | AR | |
| Boldly Go |
Reach the bridge of the space station |
200 | 2 | Yes | AS | |
| Megacide |
Defeat the Vengeance Queen |
500 | 5 | Yes | AT | |
| Outpatient |
Escape the Medical Facility |
100 | 1 | Yes | AU | |
| B and E |
Complete Vengeance level 2 (Lockdown) without the security pass |
100 | 1 | Yes | AV | |
| Oology |
Complete Vengeance level 3 (Breach) without breaking an egg |
200 | 2 | Yes | AW | |
| Monstracide |
Kill the guard on Vengeance level 4 (Infest Station) |
200 | 2 | Yes | AX | |
| Arsenal |
Finish Vengeance level 5 (Bridge) holding every weapon |
200 | 2 | Yes | AY | |
| Trimonstracide |
Kill all three guards and complete Vengeance level 6 (Nightmare) |
300 | 3 | Yes | AZ | |
| Unimanus |
Complete Vengeance level 7 (Invasion) never holding more than one explosive charge |
300 | 3 | Yes | BA | |
| Ovaphobia |
Complete Vengeance level 8 (Torment) having destroyed every egg |
300 | 3 | Yes | BB | |
| Harsh Language |
Complete Vengeance level 9 (Planet-side) without using energy weapons |
500 | 5 | Yes | BC | |
| Starship Champion |
Complete Vengeance, unlocking hard mode |
500 | 5 | Yes | BD | |
| Golden Key |
Complete Vengeance level 2 (Lockdown) from a pistol start |
100 | 1 | Yes | BE | |
| Golden Shield |
Complete Vengeance level 3 (Breach) from a pistol start |
100 | 1 | Yes | BF | |
| Golden Guard |
Complete Vengeance level 4 (Infest Station) from a pistol start |
200 | 2 | Yes | BG | |
| Golden Wheel |
Complete Vengeance level 5 (Bridge) from a pistol start |
200 | 2 | Yes | BH | |
| Golden Lights |
Complete Vengeance level 6 (Nightmare) from a pistol start |
200 | 2 | Yes | BI | |
| Golden Bomb |
Complete Vengeance level 7 (Invasion) from a pistol start |
300 | 3 | Yes | BJ | |
| Golden Parachute |
Complete Vengeance level 8 (Torment) from a pistol start |
300 | 3 | Yes | BK | |
| Golden Sunset |
Complete Vengeance level 9 (Planet-side) from a pistol start |
500 | 5 | Yes | BL | |
| Diamond Champion |
Complete Vengeance in hard mode |
1000 | 10 | Yes | BM | |
| Starship Marine |
Reach the rank of 'Lone Wolf' |
500 | 5 | No | AD | |
| Gordon's Alive |
Escape the planet on Vengeance level 10 (Hostile Revenant) |
500 | 5 | Yes | BN |
All information for these achievements is stored on their respective pages, along with walkthroughs and tips for many of them. So, if you notice a mistake, or have a good strategy, go there!
Did you notice a missing achievement? You can help the FunOrb Wiki by making a page for it. Simply type the achievement name in this box to make a page for it.<createbox>
width=30
break=no
prefix=Hostile Spawn/Achievement:
preload=FunOrb Wiki:Achievement Articles/Preloader
buttonlabel=Create page
</createbox>
Trivia
- Hostile Spawn is currently the #7 most played game on FunOrb.
- Hostile Spawn originally had only three levels available to free players, while the other seven levels were member-only. Later on, Jagex made all the levels available to free players. This was before the Vengeance expansion.
- The plot of the games is similar to the Alien franchise.
- For a short time (before the Vengeance expansion but after all Kerrus levels were available for free players), certain achievements were marked as members-only, when they could all be achieved by a free player. This was quickly fixed by Jagex.
- All of the achievements' images were changed along with the release of the Vengeance expansion on the 13th of January 2010.
- The name "Hostile Spawn: Vengeance" may be a reference to the game, "Alien Shooter: Vengeance".
- The Gordon's Alive achievement becomes visible after completing the Vengeance levels. It is a reference to Brian Blessed's identical exclamation in the film Flash Gordon, delivered upon the discovery that Flash has unexpectedly escaped from a destroyed world.
- The Starship Trooper achievement is probably named after the movie and book of the same name.
- With the Vengeance update in German, Hostile Spawn's name changed from Alien-Brut to Hostile Spawn.
- The Starship Commando achievement is marked as free-to-play, but due to the January 2010 update, it is now apparently impossible to achieve for free players, even on Kerrus hard mode.
- The Unimanus icon is similar to the one for Total Destruction Award in Dr Phlogiston Saves the Earth.